The Difference
ColorBox Digitizing takes the time to manually digitize tatami fills as well as the lower density underlays. Utilizing both of these techniques is virtually unknown to the vast majority of embroidery digitizers in this industry. We have provided some examples below that explain some of the benefits to this approach. In addition, we have provided some visual examples on how we digitize satin lettering and borders. At the bottom of this page there are downloadable machine files available that were used in conjunction with the creation of this web page.
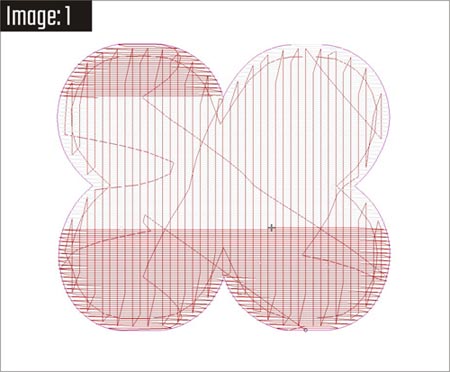
Using the "complex fill tool" for an object such as in Image 1, will lead to what we call "stitchbacks". As you can see, the upper left segment of the object has been stitched out of sequence which creates a "stitchback" in the fill. This will lead to stitch gapping and possibly puckering the fabric. Our manual technique avoids this type of error. We always keep the fills flowing in the same direction, in sequence and there's never any "gapping". You can also see in this image odd and useless navigation created by using the auto-underlay features of the software. By manually digitizing all underlays, we avoid these useless stitches. It's always a good idea to have the underlay stitches, either run stitches or light density tatami stitches, flowing in a consistent direction. This will help the fabric remain in a stable environment while hooped creating a far less possibility for puckering or shifting during the embroidery process.

The 6 images above (click the image for a larger version) show the consistency of manually digitizing all underlays and main fills. Everything flows in the same direction with no odd or out of place navigational stitches. This leads to a smooth filled object with no gapping nor the possibility of puckering of the fabric. It's also less stitches and a shorter machine run time.
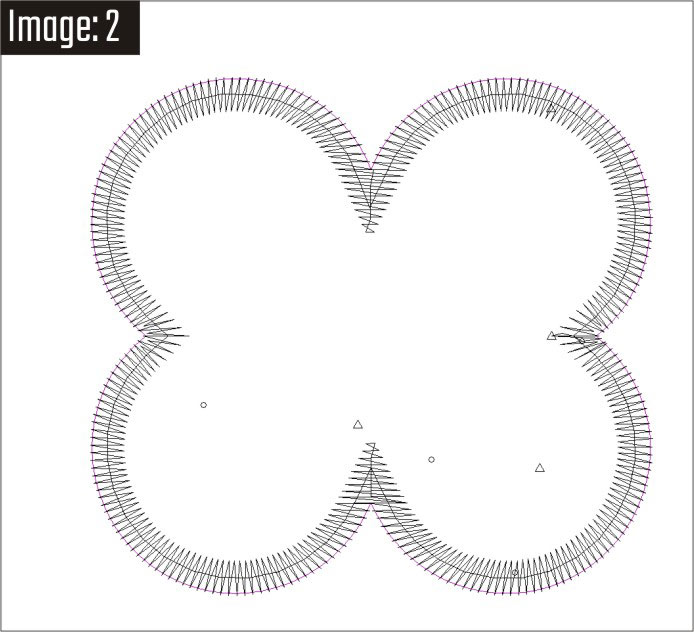

Image 2 shows the most common method most digitizers use for object borders. This input method, though faster, does not allow for full control over corners, stitch angles or column width. Image 3 shows the manual nature of our input method. The corners will be more crisp, the two middle "capped" pieces avoid unnecessary short stitch lengths and we can control the column widths of the left and right sides. The left and right sides need to be a little thicker to the inside where the satin border stitches match the angle of the interior tatami fill stitches. This will lead to a more consistent stitch length around the entire filled piece once embroidered.
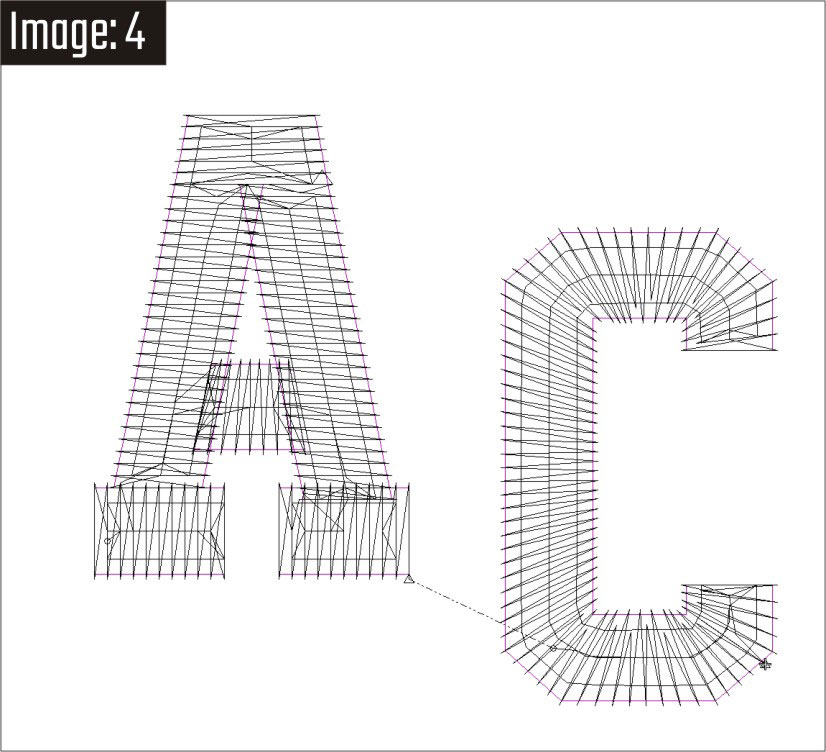
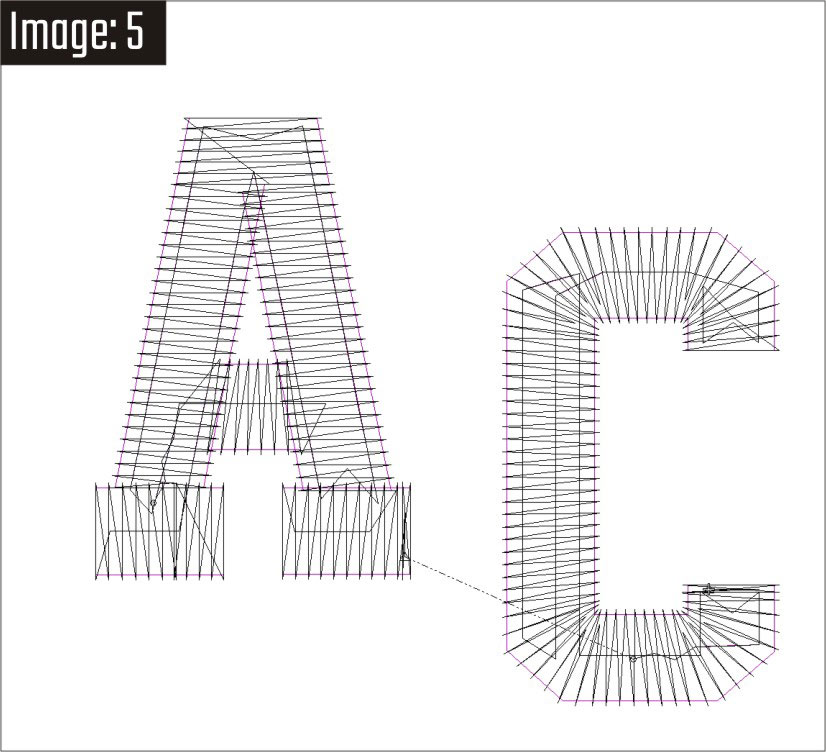
Image 4 represents how most digitizers digitize letters. They added edgewalk underlay to all of the segments when for where these letters fall on the fill, only the vertical columns need edgewalk underlay where the satin stitches are the same angle/direction as the interior fill stitches. Image 5 shows how we would digitize these letters with the manual underlay having edgewalk only where necessary. By manually digitizing the underlay, we can control all placement and avoid unnecessary short useless travel stitches.
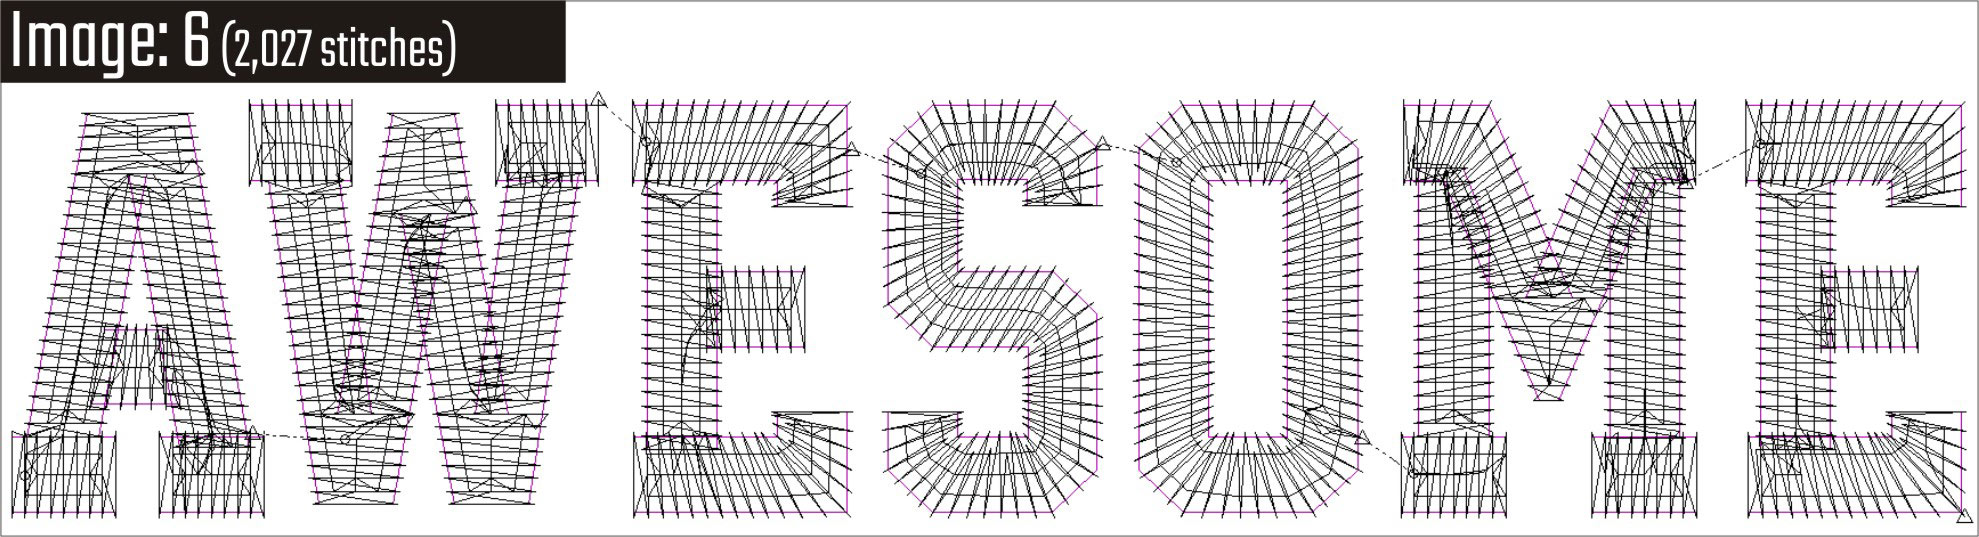
Image 6 is a representation of "keyboard" text. Edgewalk underlay is used everywhere. Notice the odd exit points from one letter to another, the uncontrolled stitch angles and a plethora of tiny useless travel stitches.
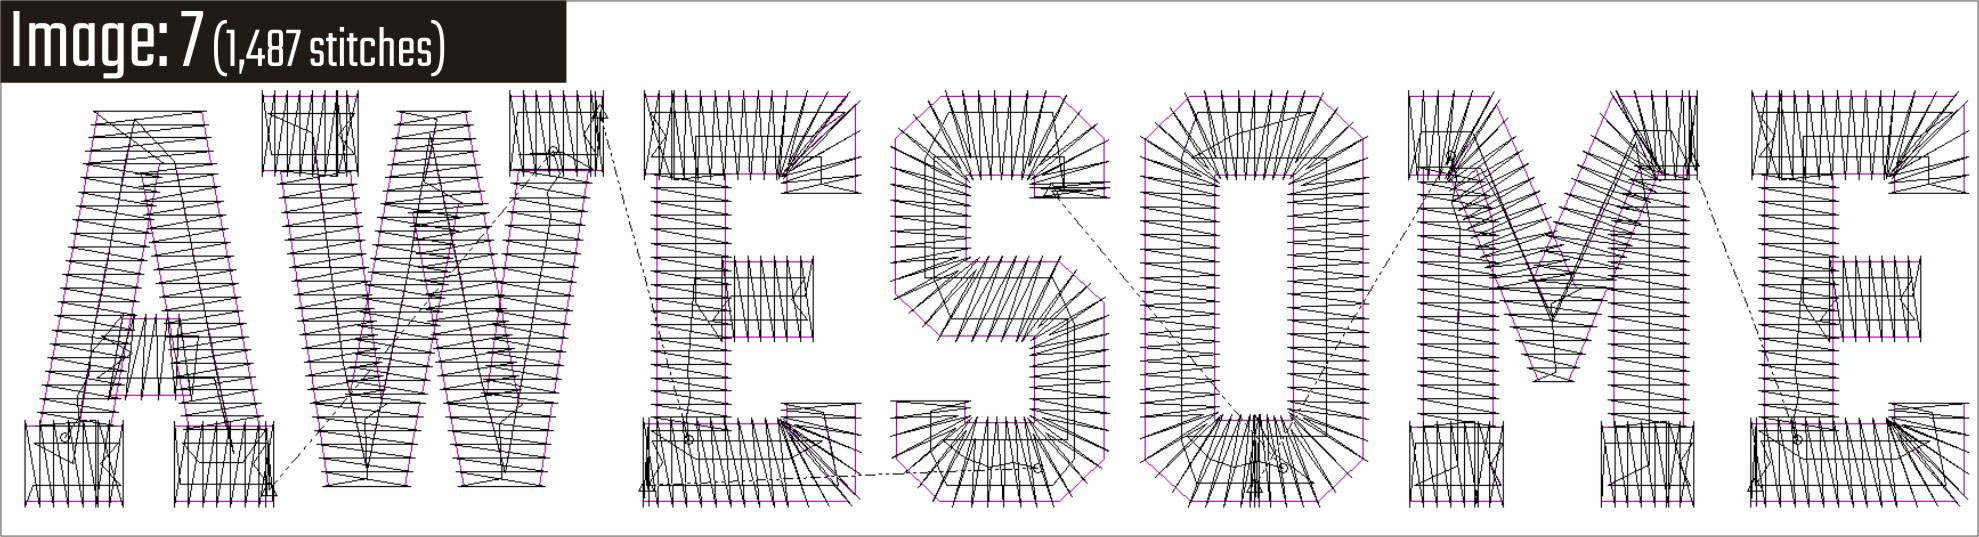
By manually digitizing the letter and the underlay as in image 7, we can control the stitch angles, exit points, and there are no useless or redundant travel stitches. We can also control the placement of the underlay stitches. On fabrics such as pique knit, edgewalk is only necessary on horizontal columns where the satin stitches match the direction of the fabric weave. Pique knit, and many other similar fabric types, have a vertical pattern weave. The horizontal satin stitch columns that go in the same direction of this weave will "sink" into the weave of the fabric. By making the horizontal satin stitch columns a little thicker and adding edgewalk underlay to only these parts, the letters stitch out with a consistent column width. This is only possible by manually digitizing the letters and their underlay. This word alone is more than 500 stitches less by using manual techniques.

Digitizing small text with serifs is one of the most challenging aspects of digitizing. The "shell" of the letters in Image 8 is exactly the same as in Image 9. But the letters in Image 8 have no control over underlay or the tie ins/tie offs for the individual letters. Using auto-underlay for small text is never a good idea. Auto-underlay will only underlay before each satin segment. This causes redundant stitches under a very thin satin column. Allowing the software to handle the stitch tie ins and tie offs causes small stitches and needle penetrations right on top of one another. This will lead to thread breaks and frayed stitches for someone to clean up after the garment is embroidered.

By manually digitizing the underlay, tie ins and tie offs, there is far less chance of thread breaks and virtually no mess to be cleaned up. In just these small 7 letters, there is a save of 137 stitches. Just imagine if you can save 137 stitches in just 7 letters what you can save in an entire complex project by using ColorBox's manual digitizing methods!
Other Techniques Used by ColorBox
-
"Manual control of start/end columns: The beginning and end of an open ended satin column has a push/pull effect than can only be controlled manually. This is how we control the consistency of individual letter height so that the entire word or phrase is even once the file is embroidered. If you use the software's keyboard text, the letters will be uneven heights and appear "wavy".
-
Turning and splitting satin stitch corners: We often "split" satin stitch corners to have better control of the sharpness and thread density of the corner. We also will add angle lines before and after the corner to control the "turning" of the stitches. If you allow the software to make the decision of when to start/end the turn, the stitch length will be inconsistent and make the column appear to have an uneven width.
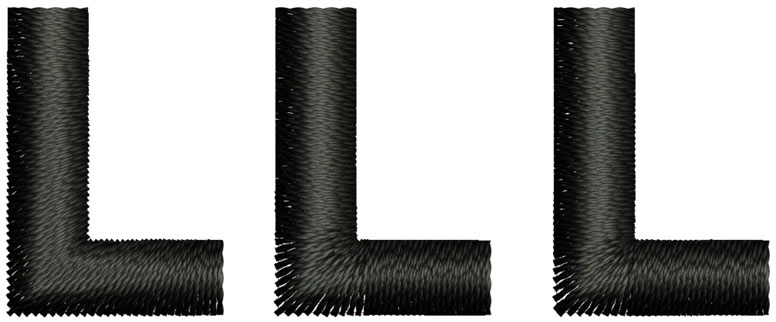
The left L has no corner turn control and will look uneven when embroidered. The middle L has corner turn control but because it's not split, will have uneven stitch density approaching and exiting the corner. The right has corner turn control and a split corner. This embroidered, will have very consistent stitch density approaching and exiting the corner and will have the most consistent column width of the 3 techniques.
-
Manual control of exit columns: When exiting an object, we always overlap the stitches rather than just moving the end point to the exit point. If you don't overlap, there will likely be a gap between the stitches. The software alone doesn't account for the lack of an overlap stitch. By manually controlling the exit, we can assure there will be no stitch gaps.
-
Manual tie ins and tie offs: All digitizing software has automatic thread tie ins that simply stitch back and forth along the same thread line. This auto feature can cause thread breaks and "birdnesting". We manually digitize a 3 to 4 stitch zig zag pattern that will allow the machine to create a proper balance between the top thread and the bobbin thread. We also manually digitize the tie-offs for most objects. This leaves a cleaner exit before the machine trim.
-
Different settings for each client and machine: We ask all new clients to provide us with an image of the sewout for their first couple of digitizing projects so we can adjust our settings such as push/pull compensation. Over the years we have noticed that there is no "one size fits all" digitizing property setting(s). There are so many variables between machine type and individual tension settings, that we need to make specific adjustments to all of our digitizing properties. These settings are kept on file and relayed to each and every staff digitizer to ensure the embroidery files are consistent for every project.
Downloadable Files
The two files on the left are the "good" examples used above, demonstrating ColorBox techniques. The right two are examples of typical embroidery digitizing that is common in this industry. Select EMB if you use Wilcom, otherwise download the DST file. If you'd like a different file type, contact us to let us know and we'd be happy to provide them.
Awesome Company EMB 
|
Awesome Company DST
|
Average Company EMB
|
Average Company DST
|